Connecting to Relativity

This BluePrint guides you through connecting ReadySuite to Relativity.
ReadySuite can connect to RelativityOne, Relativity Server 2023, Relativity Server 2022, and Relativity Server 2021.
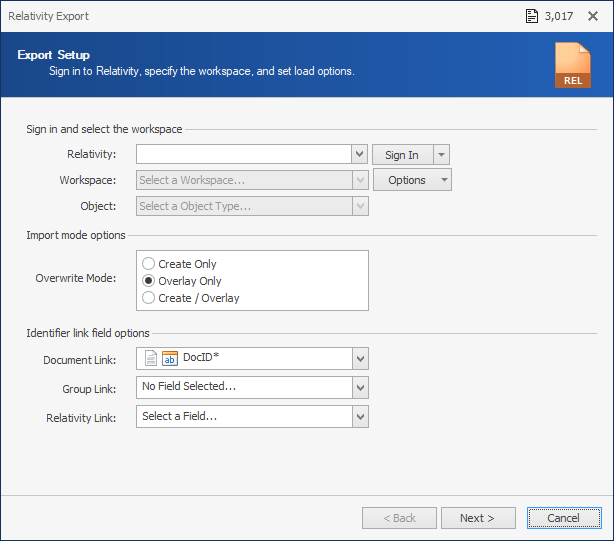
You can setup your connection to Relativity from both the Import Setup page of the Relativity Import wizard and the Export Setup page of the Relativity Export wizard.
RelativityOne requires OAuth2 authentication, while Relativity Server highly encourages using OAuth2 authentication. You can set up OAuth2 authentication and username and password using the Manage Credential dialog box.
To set up the connection between ReadySuite and Relativity
- Do one of the following:
- If you are connecting to Relativity to import data, in the ReadySuite ribbon, click Platform Source and in the Review list, click Relativity to open the Relativity Import wizard.
- If you are connecting to Relativity to export data, import to ReadySuite the data set you want to export to Relativity, then in the ReadySuite ribbon, click External Data and click Relativity to open the Relativity Import wizard.
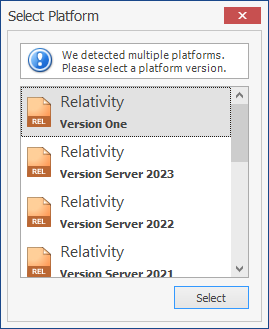
- If the Select Platform dialog box appears, select the version of Relativity you want to use: RelativityOne or Relativity Server.
- In both Relativity wizards, the Import Setup page and Export Setup page have a Sign in and select the workspace section.
If this is the first time you are connecting to Relativity, click Sign In to open and complete the Manage Credentials dialog box.
Note: ReadySuite continues to use the selected version of Relativity until you close and restart ReadySuite. Alternatively, you can hold SHIFT on your keyboard before clicking the Relativity Import or Relativity Export button in the Ribbon to select a different platform version.

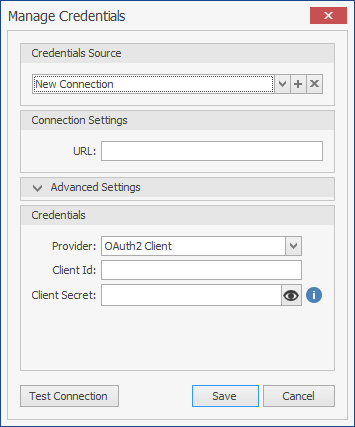
Manage Credentials
With the Manage Credentials dialog box, you can add new connections to Relativity and Nebula, as well as update or delete existing connection credentials.
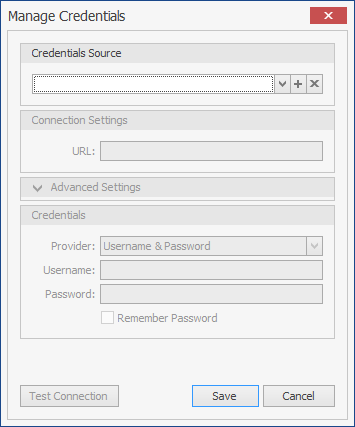
ReadySuite supports three credential providers:
OAuth2 Client (Implicit Flow)(supported by default)OAuth2 Client (Client Credentials)(disabled by default)Username & Password(disabled by default)
Two factor authentication to RelativityOne or Relativity Server can be implemented by configuring Relativity and ReadySuite to use OAuth2 authentication.
To modify the details of an existing connection
- In the Credential Source section, click
 and select the connection you want to update.
 - Change the contents for the Connection Settings and Credential sections as required.
- Click Save.
To verify the information on the Manage Credentials dialog box can connect to Relativity
- Click Test Connection.
- If connection test was successful, click Save.
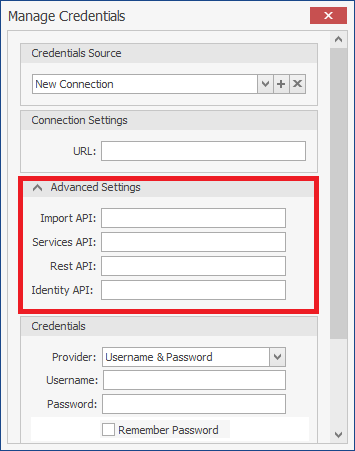
- If these steps do not create a connection, contact your system administrator to complete the following:
- In the Advanced Settings section, click the down arrow and enter the APIs manually for the services below.
- Import API
- Services API
- Rest API
- Identity API
Note: In typical environments and setups, you do NOT need to enter values for these settings.:
To delete an existing connection
- In the Credential Source section, click and select the connection you want to delete.
- Click
 .
. - On the Delete dialog box, click Delete.
- Click Save.
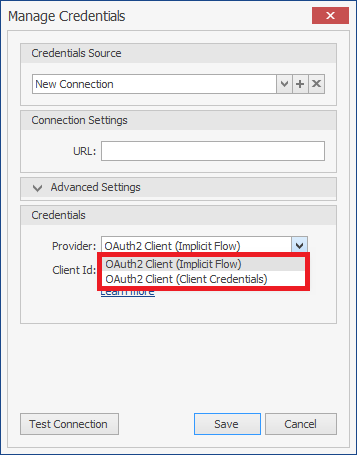
OAuth2 Authentication
ReadySuite supports two flow grant types, implicit and client credentials. Using the Implicit flow type is highly recommended. The client credentials flow grant type should be avoided and is disabled by default when using ReadySuite.
To set up OAuth2 authentication for ReadySuite in Relativity
Note: Requires Administrator credentials. For more information, see OAuth2 clients.
- Log in to Relativity
- In the sidebar, click Authentication > OAuth2. (If the Authentication tab is not displayed in the sidebar, click More > Authentication > OAuth2.)
- On the Authentication > OAuth2 page, click New OAuth2 Client.
- In the OAuth2 Client Information section, enter the Name of the client application (example:
ReadySuite). - In the Flow Grant Type, select
Implicit(recommended). - If you selected
Implicit, in the Redirect URLs, enterhttp://relativityimplicit/ - In the Access Token Lifetime, enter
600. - Click Save and Back.
- On the OAuth2 page, click the OAuth2 client you created (example:
ReadySuite). - In the OAuth2 Client Information page,select and copy the Client Id.
The backslash at the end must be included.
To setup the RelativityOne or Relativity Server connection configured for OAuth2 authentication
- On the Manage Credentials dialog box, in the Credentials Source drop list, select
New Connection. - In the Connection Settings section, enter the URL of the Relativity connection path configured for OAuth2 authentication.
- In the Credentials section, in the Provider drop list, select
OAuth2 Client (Implicit Flow)orOAuth2 Client (Client Credentials). - Enter the Client Id (generated and copied in step 9 of To set up OAuth2 authentication for ReadySuite in Relativity).
- If you are using a client credentials grant flow type, enter the Client Secret (generated and copied in step 9 of To set up OAuth2 authentication for ReadySuite in Relativity).
If you are using an implicit grant flow type, the Client Secret is not required for Relativity with OAuth2 provider. (Contact your System Administrator to confirm.) - Click Test Connection.
- If you are using an implicit grant flow type, on the Relativity Login dialog box, enter your Username and Password and click Login.
- On the Connection Test dialog box, click OK.
- Click Save.
Note: The path should end with the domain. Do not include any directories past that.
Example
Correct
https://relativity.example.org
Incorrect
https://relativity.example.org/Relativity
Note: To create a new connection for RelativityOne, follow the same procedures listed above with the following modifications.
Connection Settings section
URL: Enter the URL of the RelativityOne connection path.
Example
https://examplefirm.relativity.one
Username and Password Credentials
By default, the username and password option for connecting to Relativity is disabled. We highly recommend setting up an OAuth2 Client for connecting to Relativity instead.
To enable the username and password credentials option for connecting to Relativity
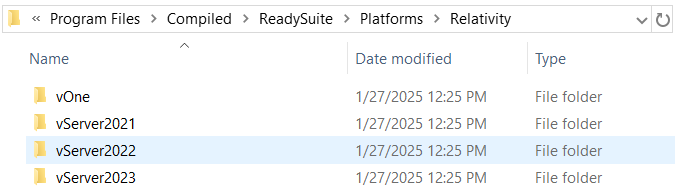
- In the installation folder for ReadySuite, select Platforms > Relativity, and select the version of Relativity you to enable to use the username and password option for connection.
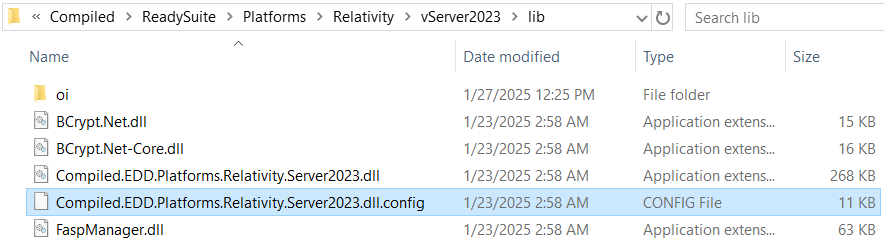
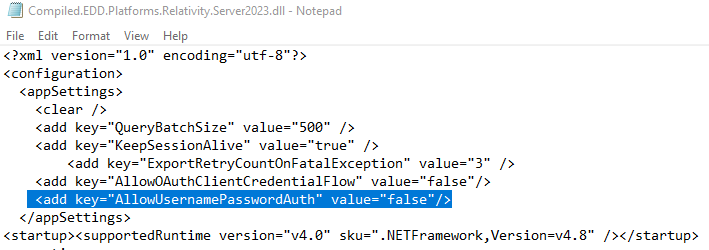
- In the lib folder for the version of Relativity you want to configure, open the applicable
Compiled.EDD.Platform.Relativity.[server version]. dll.configfile. (This file must be modified to enable the username and password option.) - Change the line
<add key="AllowUsernamePasswordAuth" value="false"/>to<add key="AllowUsernamePasswordAuth" value="true"/>. - Save the updated file and restart ReadySuite.
To create a new Relativity Server connection with username and password credentials
- By default, the username and password option for In the Credential Source section, click
 .
. - On the Manage Credentials dialog box, in the Credentials Source drop list, select
New Connection. - In the Connection Settings section, enter the URL of the Relativity Server connection path.
- In the Credentials section, in the Provider drop list, do one of the following: enter the Username and Password.
- To bypass verifying credentials for connecting to Relativity in future sessions, select Remember Password.
- To verify the information on the Manage Credentials dialog box can connect to Relativity, click Test Connection.
- If connection test was successful, click Save.
If these steps do not create a connection, contact your system administrator.
Note: The path should end with the domain. Do not include any trailing slashes after that.
Example
Correct
https://relativity.example.org
Incorrect
https://relativity.example.org/Relativity