Relativity
Relativity data, such as coding, can be imported into ReadySuite with the Relativity Import wizard. This can then be used to perform quality control on production sets.
Note: For details on how to set up the connection between ReadySuite and Relativity, please see the Connecting to Relativity BluePrint.
To import a load file
- In the ReadySuite ribbon, click External Data > Platform Source > Relativity to open the Relativity Import wizard.
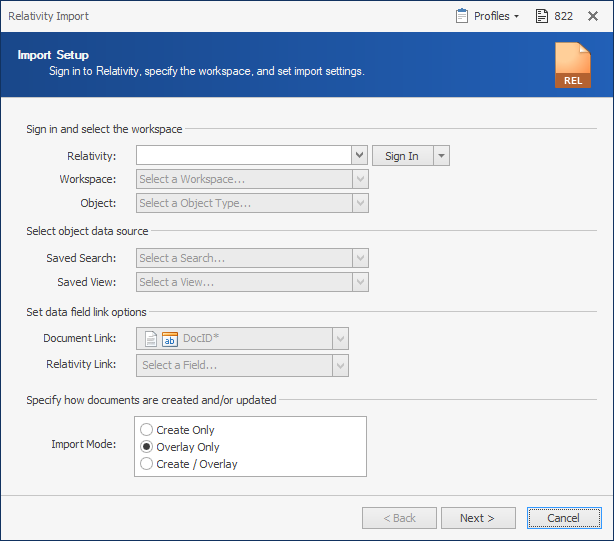
If multiple Relativity platforms are present, use the Select Platform dialog box to select the version of Relativity you want to access. - On the Import Setup page, select the Relativity connection you want to use.
If this is the first time you are connecting to Relativity, click Sign In > Manage Credentials to open and complete the Manage Credentials dialog box.
If you have previously signed into Relativity, the most recent Relativity instance appears. - Select the Workspace you want to import from.
- Select the type of Object you want to export from. (
Documentis selected by default). - Select the object data source from the following:
- Saved Search: Select if using
Documentas your selected Object. - Saved View: Select if using anything other than
Documentas your selected Object. - Select the object data source and set data field link options.
- Select the data field link options from the following:
- Document Link
- Relativity Link
- Select the Import Mode for each load file you want to import from the following:
- Create Only: Allows only new load files to be added to the ReadySuite project.
- Overlay Only: Requires load files to overlay an existing load file in the ReadySuite project.
- Create/Overlay: Adds new load files and those matching an existing load file in the ReadySuite project.
- Click Next.
- On the Import Fields page, use the arrows to select from the Relativity Fields list the fields you want to import from the Relativity. The Source Field is the Relativity file. The Destination Field is the field that is populated in ReadySuite.
- Rename the Field Name and select the Type as necessary.
- Click Start.
- On the Import Progress page, view the details of the import process.
- Click Finish.

Note: Click the Filter icon  to select from a limited set of fields, such as a saved search.
Note: If warnings exist, the Warnings icon ![]() displays the number of instances. Click to view the Event Log for details.
displays the number of instances. Click to view the Event Log for details.
The imported Relativity files are listed in the Document Grid View.